Basically, if you have a group of blocks that you LOVE, and know you would use elsewhere in your site, you can group them and then add them to “reusable blocks”.
Then, you can use them in 2 ways:
- as a static section (great for things you find yourself repeating like my disclosure statements or a list of services). You change it one time; it updates EVERY one you inserted.
- as a baseline section (great for keeping your site on-brand stylistically while making small changes like listing board members). You convert the single instance into a regular block and make small edits.
You will need:
- a website, running most recent version of WordPress.ORG.
- Gutenberg Blocks [built-in] -OR- Atomic Blocks [free plugin]
Atomic Blocks is a free plugin that offers templated, Gutenberg-fueled blocks. They have recently added a feature called “Layouts” which offers sections (a grouping of blocks), and entire pages built from blocks. It currently offers 8 sections and 4 pages (they call the pages layouts yet the feature is called that too…confusing, hence my naming choice).
At the time of this writing, 24 April 2020, Atomic Blocks Pro is in beta and seems to only be available through my partner, WP Engine. It offers some 38 sections and 22 pages/layouts.
The below blocks were made to look like the section featured in Atomic Blocks Pro, called “Number List” yet was made using just the Free version of Atomic Blocks and again with the Blocks that come baked in WordPress. (I made them as close as possible to the paid offering because I want to show you how anyone can make beautiful sections for your website and, if you have the time to learn, you don’t always need the paid version to do what you need.)
Reusable Block using Atomic Blocks – as is:

15
Team Members

2,000
Customers

9,000
Subscribers

10
Years Running
Reusable Block using Built-in Blocks – as is:

15
Team Members

2,000
Customers

9,000
Subscribers

10
Years
It’s not as option rich as Atomic Blocks in this specific instance, but if you were reluctant to add one more plugin, it would work. Especially if one adds some css specific styling.
How To Make One:
Quick caveat: I’ll be assuming you know a little bit about Blocks but not everything. You can find an overview on WordPress.ORG. Terms “Block Toolbar” means the little toolbar that appears over the box itself; “Block Settings” means the sidebar to your right (may have to toggle it open via the cog icon above).
written instructions – Atomic Blocks:
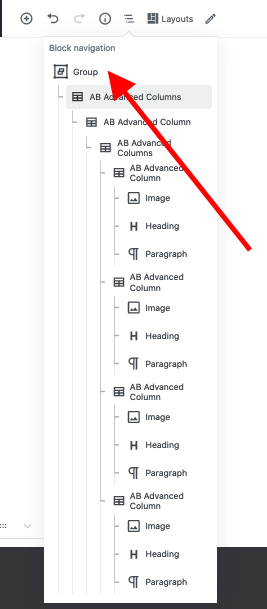
- Add Block called “AB Advanced Columns”. It will be our outermost “box”. Configure it with the two settings areas. Around the block itself is a toolbar that should appear when you move your mouse; give it a “Full Width”. Within the block’s Settings sidebar [cog icon], under General, give it a Column Count of 1; a Column Gap of 2; and a max width of 1200px. In Margins + Paddings, change all units to Percent. Then pause and once we add more content, come back and play around until it seems to fit well.
- Move inside the innermost block. Inside it, Add another AB Advanced Columns block. Give it 4 columns.
- Inside each of the 4 columns, add
- Image Block. add your image; center the block via block toolbar; resize your image in Block Settings if it’s large – I used 100 x 100px.
- Heading Block. add your content; center the block via block toolbar; I used H3.
- Paragraph Block. add your content; center the block via block toolbar.
- Save your draft.
- Finally, highlight/select all your blocks. Release and a different toolbar should appear. Head to the ‘more’ [3 dots] option and select “Group”.
- Be sure you’re in your new group. Again, select the ‘more’ option from the toolbar and this time select “Add to Reusable Blocks”. Name your block something memorable.
When you’re done, your outline should look like this:

written instructions – Built in Blocks:
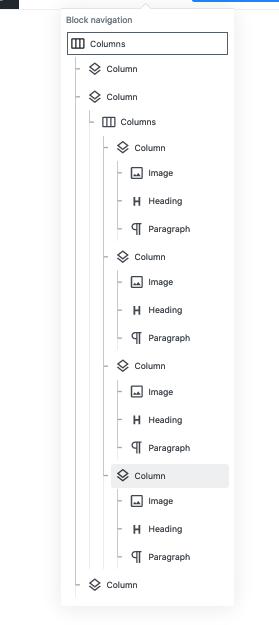
- Add Block called “Columns”. It will be our outermost “box”. Select the 3 columns options, with the middle one larger than the outer ones. Around the block itself is a toolbar that should appear when you move your mouse; give it a “Full Width”.
- Move to the left most column. In the Block Settings, change the percentage width to 12.5.
- Do the same for the right most column. This will give you some additional space for your columns in the middle.
- Move inside the innermost block in the center. In the Block Settings, change the percentage width to 75%. Inside it, Add another Columns block. Give it 4 columns.
- Inside each of the 4 columns, add
- Image Block. add your image; center the block via block toolbar; resize your image in Block Settings if it’s large – I used 100 x 100.
- Heading Block. add your content; center the block via block toolbar; I used H3.
- Paragraph Block. add your content; center the block via block toolbar.
- Save your draft.
- Finally, highlight/select all your blocks. Release and a different toolbar should appear. Head to the ‘more’ [3 dots] option and select “Group”.
- Be sure you’re in your new group. Again, select the ‘more’ option from the toolbar and this time select “Add to Reusable Blocks”. Name your block something memorable.
When you’re done, your outline should look like this:

Edit your reusable block
Editing your reusable block is easy – select it, choose “edit” option, make change, click the save button for that reusable block. Just recall it will change the content and styling for ALL locations you’ve already used this. If you want the block to look similar but have different content / photos, read on…
Convert your reusable block
Insert the reusable block you want to use. Using the block toolbar, choose the ‘more’ menu and select “Convert to Regular Block”. Now you can make small edits without changing all of content – and without trying to remember all the settings the other block sections had…
Reusable Atomic Block – converted to “regular block” and edited:

1
Agency

8+
Happy Customers

265
Subscribers

2
Years Running
Let me know how you did in the comments!
Affiliate Disclosure: This post may contain affiliate links which means if you click a link and then make a purchase, I’ll get a commission at no additional cost to you. I try to mark them all with a (^), but sometimes miss them in final publication. Like all products I write about, I absolutely love + use this one in my personal + / or work day-to-day (I write about non-affiliated and FREE products too!).
